Search Our Web Design Blog...

Wednesday, March 30, 2011

Intro to FLASH!


5 layer movie
100+ frames
make 5 or more tweens

Monday, March 28, 2011

Let's create a web hosting account & domain

http://www.000webhost.com/

this is a site that allows for free web hosting. Once at the site, click on "order now" under the free hosting column. We will create domains hosted/owned by them (i.e.www.scweb.freeiz.com, the second option when creating an account). You will be prompted to enter some personal information (email, name, etc). Make sure you remember your password!

Once you have entered your info, it will load your site and take you to a screen showing the following info:

The info circled above will be your log in information using CYBERDUCK to access your server and upload your site!

How to upload your site to the WEB!

Connecting to your Web server using CYBERDUCK

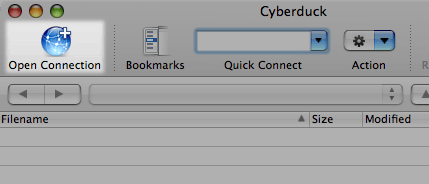
The first thing you need to do is connect to your Web server. To do this, first open a new Cyberduck browser window, if one isn't already open, by choosing File > New Browser. Now choose File > Open Connection, or click the Open Connection button at the top left of the browser window:

Open Connection button
Click the Open Connection button to connect to your Web server.

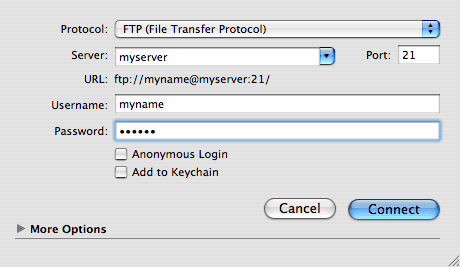
This displays a dialog where you can enter your web server's name (Server), your login name (Username), and your login password (Password). Enter your details, then click Connect to connect to your server:

Connection dialog
Enter your server details in the dialog, then click Connect to connect to the server.

You may be behind a proxy server or firewall, especially if you're trying this from work. If so, you will need to get your firewall details from your IT support people. To configure Cyberduck to work through an FTP proxy server in Mac OS X 10.4 (Tiger), open the System Preferences application, then click Network, then the Proxies tab, check the FTP Proxy option in the list, and enter your FTP proxy details.


Your home directory

Once logged in, you will be taken to your home directory on your Web server. This directory contains (amongst other things) your website directory, which is where you need to upload all your files:

Home directory
Your home directory on the server contains your website directory (highlighted), which is where the website's files go.

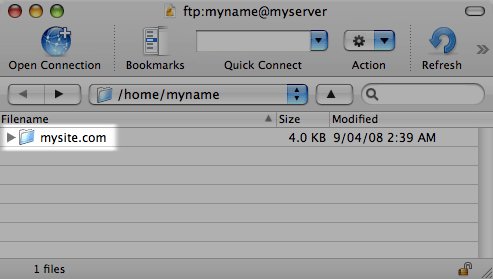
Double-click your website directory - mysite.com in the above screenshot - to browse its contents.

Your document root

The top level folder of your website is often called the document root. This is where you will place your first website files. The document root is often named htdocs or public_html, and is usually inside your website directory.

Document root directory
Your website directory contains 
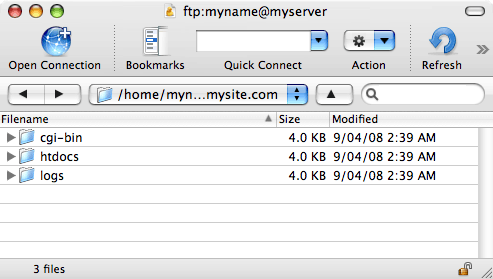
htdocs, your document root directory - the top level of your website.

Double-click your document root folder - htdocs in the above screenshot - to browse its contents.

Uploading a Web page

Once you've found your document root, you're now ready to upload your website. Here, we're going to upload our first page, index.html, which should be the name of the main page of your website.

The easiest way to do this in Cyberduck is to open the website folder on your hard drive using the Finder, then drag the file from the Finder to the Cyberduck window:

Uploading a file
Uploading the website's index page file by dragging it from the Finder to Cyberduck.

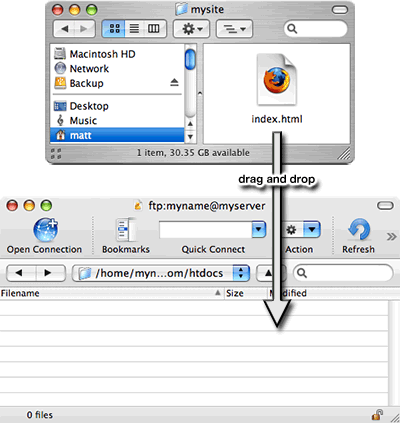
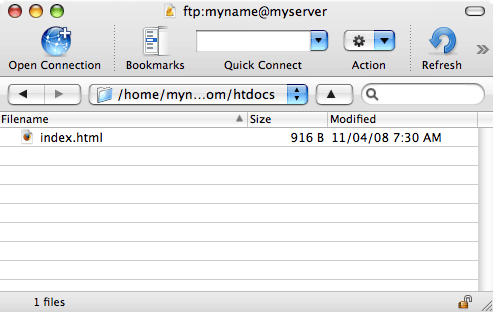
You'll see a Transfers dialog appear as Cyberduck uploads the file to your Web server. When it is finished you should see a copy of your file in the Cyberduck window. Congratulations - you've just uploaded your Web page!

Upload complete
The website's index page is now uploaded to the Web server.

How does the web work????

Friday, March 25, 2011

Critique questions

  1. thoughts on the site - is it good looking, informative, functioning.
  2. tips for improvement
  3. content, what is good and or needs improvement?

WEB 1 Dreamweaver project

By this point you should be nearly done with your dreamweaver site. At the start of class today we are going to critique them, then have an opportunity to make edits/changes and complete anything missing.

Your site should be/have:
  • 4+ pages
  • SC related theme/topic
  • content on each page
  • banner(s) on each page made in PS
  • buttons (flash, text, PS)
  • layout table that is consistent from page to page (buttons and main objects should not move)
  • aesthetically pleasing
  • logically laid out and organized

Friday, March 11, 2011

Web 2 project

We will be creating a site for a gardener. She will be providing information, and incentives for the student whose design she like the best. Our starting point is to create a CSS layout to base the page on. We do not know the ins and outs of what all she wants yet, but can start with a basic layout using CSS so it is easily editable.

have a look at wikipedia for a rationale for using CSS in favor of tables:

http://en.wikipedia.org/wiki/Tableless_web_design

examples can be found here:

http://www.maxdesign.com.au/articles/css-layouts/

Web 2 - CSS layout, a new way to start a site!

When creating a new page in Dreamweaver, you can create one that already contains a CSS layout. Dreamweaver comes with over 30 different CSS layouts that you can choose from. Additionally, you can create your own CSS layouts and add them to the configuration folder so that they appear as layout choices in the New Document dialog box.

Dreamweaver CSS layouts render correctly in the following browsers: Firefox (Windows and Macintosh) 1.0, 1.5, and 2.0; Internet Explorer (Windows) 5.5, 6.0, 7.0; Opera (Windows and Macintosh) 8.0, 9.0; and Safari 2.0.

Create a page with a CSS layout

  1. Select File > New.
  2. In the New Document dialog box, select the Blank Page category. (It’s the default selection.)
  3. For Page Type, select the kind of page you want to create.
    Note: You must select an HTML page type for the layout. For example, you can select HTML, ColdFusion®, JSP, and so on. You cannot create an ActionScript™, CSS, Library Item, JavaScript, XML, XSLT, or ColdFusion Component page with a CSS layout. Page types in the Other category of the New Document dialog box are also restricted from including CSS page layouts.
  4. For Layout, select the CSS layout you want to use. You can choose from over 30 different layouts. The Preview window shows the layout and gives a brief description of the selected layout.

    The predesigned CSS layouts provide the following types of columns:

    Fixed
    Column width is specified in pixels. The column does not resize based on the size of the browser or the site visitor’s text settings.
    Elastic
    Column width is specified in a unit of measurement (ems) relative to the size of the text. The design adapts if the site visitor changes the text settings, but does not change based on the size of the browser window.
    Liquid
    Column width is specified as a percentage of the site visitor’s browser width. The design adapts if the site visitor makes the browser wider or narrower, but does not change based on the site visitor’s text settings.
    Hybrid
    Columns are a combination of any of the previous three options. For example, the two-column hybrid, right sidebar layout has a main column that scales to the size of the browser, and an elastic column on the right that scales to the size of the site visitor’s text settings.
  5. Select a document type from the DocType pop‑up menu.
  6. Select a location for the layout’s CSS from the Layout CSS in pop‑up menu.
    Add To Head
    Adds CSS for the layout to the head of the page you’re creating.
    Create New File
    Adds CSS for the layout to a new external CSS stylesheet and attaches the new stylesheet to the page you’re creating.
    Link To Existing File
    Lets you specify an existing CSS file that already contains the CSS rules needed for the layout. This option is particularly useful when you want to use the same CSS layout (the CSS rules for which are contained in a single file) across multiple documents.
  7. Do one of the following:
    • If you selected Add to Head from the Layout CSS in pop‑up menu (the default option), click Create.

    • If you selected Create New File from the Layout CSS pop‑up menu, click Create, and then specify a name for the new external file in the Save Style Sheet File As dialog box.

    • If you selected Link to Existing File from the Layout CSS in pop‑up menu, add the external file to the Attach CSS file text box by clicking the Add Style Sheet icon, completing the Attach External Style Sheet dialog box, and clicking OK. When you’re finished, click Create in the New Document dialog box.

      Note: When you select the Link to Existing File option, the file you specify must already have the rules for the CSS file contained within it.

    When you put the layout CSS in a new file or link to an existing file, Dreamweaver automatically links the file to the HTML page you’re creating.

    Note: Internet Explorer conditional comments (CCs), which help work around IE rendering issues, remain embedded in the head of the new CSS layout document, even if you select New External File or Existing External File as the location for your layout CSS.
  8. (Optional) You can also attach CSS style sheets to your new page (unrelated to the CSS layout) when you create the page. To do this, click the Attach Style Sheet icon above the Attach CSS file pane and select a CSS style sheet.

Add custom CSS layouts to the list of choices

  1. Create an HTML page that contains the CSS layout you’d like to add to the list of choices in the New Document dialog box. The CSS for the layout must reside in the head of the HTML page.
    To make your custom CSS layout consistent with the other layouts that come with Dreamweaver, you should save your HTML file with the .htm extension.
  2. Add the HTML page to the Adobe Dreamweaver CS3\Configuration\BuiltIn\Layouts folder.
  3. (Optional) Add a preview image of your layout (for example a .gif or .png file) to the Adobe Dreamweaver CS3\Configuration\BuiltIn\Layouts folder. The default images that come with Dreamweaver are 227 pixels wide x 193 pixels high PNG files.
    Give your preview image the same file name as your HTML file so that you can easily keep track of it. For example, if your HTML file is called myCustomLayout.htm, call your preview image myCustomLayout.png.
  4. (Optional) Create a notes file for your custom layout by opening the Adobe Dreamweaver CS3\Configuration\BuiltIn\Layouts\_notes folder, copying and pasting any of the existing notes files in the same folder, and renaming the copy for your custom layout. For example, you could copy the oneColElsCtr.htm.mno file, and rename it myCustomLayout.htm.mno.
  5. (Optional) After you’ve created a notes file for your custom layout, you can open the file and specify the layout name, description, and preview image.

Wednesday, March 9, 2011

PICK A SC TOPIC

Chose a topic SC related. It could be a club, sport, class, teacher, event, team, group, organization etc. You will be making a 4 page site in Dreamweaver about this topic. Your task today is to gather information about your topic. Decide upon the 4 pages you will build and then create a WIREFRAME of your site.

http://builds.balsamiq.com/b/mockups-web-demo/

Then you will want to start your adventure in photoshop creating a web graphic (banner) for each page (200x800 pixels is a good size).

Friday, March 4, 2011

DEFINE a site

http://www.entheosweb.com/dreamweaver/create_site.asp

layout tables in DW

http://livedocs.adobe.com/en_US/Dreamweaver/9.0/help.html?content=WScbb6b82af5544594822510a94ae8d65-7d68.html

Wednesday, March 2, 2011

Banner assignment


Create 3 banners using any text and effects you want:

web banners in PS

Make a standard sized 468x60 banner. Many of the banners out there look like crap, so I'm here to teach you how to make a nice looking one.

Today, class, we will be completing an easy task with the pen tool, custom shapes, and layer styles.


  1. Create a document with dimensions 468px width and 60px height. Fill your first layer with white, then give it a gradient overlay layer style with the following colors. Drag the color stop on the right (the bright red color) to the middle as shown:

    Now you should have this:
  2. Using the custom shape tool, select the "Arrow 2" shape

    Make an arrow by clicking in the top left corner then holding shift and dragging down and to the right until you have a shape like below:
  3. Give the arrow a color overlay layer style using a medium red (I used #b21219), and a 1px outside stroke using a darker red (I used #a62908). Set the opacity for this layer to 50%.
  4. Duplicate your arrow layer, then with your new arrow, using the move tool (press V to use the move tool) hold shift and press the right arrow key once to move the new arrow over 10 pixels. The two arrows should now overlap, giving you this look:
  5. Select both arrow layers (by 'ctrl+click' ing each one in the Layers window). Now go to 'Layer > Merge Layers' This will combine your two arrows in to one layer.
  6. Select the new combined arrow layer (click it in the Layers window), then duplicate it (go to 'Layer > Duplicate Layer'). Now use the move tool again and once again hold shift, this time press the right arrow 6 times to move it 60 pixels.

    Repeat this process 2 more times, so you have 4 arrows. Now select all of your arrow layers and merge them.
  7. Duplicate your merged arrow layer, flip it horizontally (with the layer selected, go to 'Edit > Transform > Flip Horizontal'), then move it over to line up with the right edge of your image.
  8. Using the pen tool, draw a new layer as shown. Start by clicking number 1, then click each number until you get to number 6, then click number 1 again to complete your shape. The arrow layers should help you figure out where to click for number 2 and 5.
  9. Now give your new shape a gradient overlay as shown.

    To get this:
  10. Now select your arrow layers and move them on top of everything (select both arrow layers in the Layers window, then grab and drag them above all other layers).
  11. Add some text to the center of your image. I used 48pt Impact as the font. Try to come up with something a little more creative than "click!"
  12. Give your text a 2px outside stroke with a dark red color (mine is #b21219) and a gradient overlay from light yellow (#faf88e) to white. And you're done. Now go put your banner up everywhere and watch the traffic roll in! Check back for a tutorial on how to animate this banner to make it more eye catching.