Search Our Web Design Blog...

Thursday, May 31, 2012

Wireframes

Today you need to create a layout sketch to turn in for your final site.  You should make a thumbnail sketch of each page.... here are some tips:

http://creativebits.org/toolbox/5_unusual_ways_create_website_mockups


Ultimate Guide to Website Wireframing
Most designers wireframe their designs in one way or another, even if it just involves them making quick sketches on the back of some scratch paper. Wireframing is an important part of the design process, especially for more complex projects.
Wireframes can come in handy when you’re communicating with clients, as it allows them to visualize your ideas more easily than when you just describe them verbally.
This guide covers what you need to know about website wireframes to get started.

Why You Should Wireframe Your Web Designs

Wireframing is really the first step in the design process. Unless the site you’re designing is incredibly minimal and simple, wireframing helps clarify exactly what needs to be on the different page types of your website.
Why You Should Wireframe Your Web Designs
By taking the time to create at least a simple wireframe, you can make sure that your designs will take into account all the different page elements that need to go into the design, and that they’re positioned in the best possible way.
Wireframes are also cost-effective by saving you potential time lost due to revising a high-fidelity comp. Wireframes can easily be revised or discarded.
Wireframes give your page layouts a great starting point and a solid foundation.

Wireframe vs. Mockup vs. Prototype

Wireframes, mockups, and prototypes are sometimes used interchangeably, but they are three different things (though there is sometimes some overlap between them). Each one has a slightly different purpose that it gives to the design process.
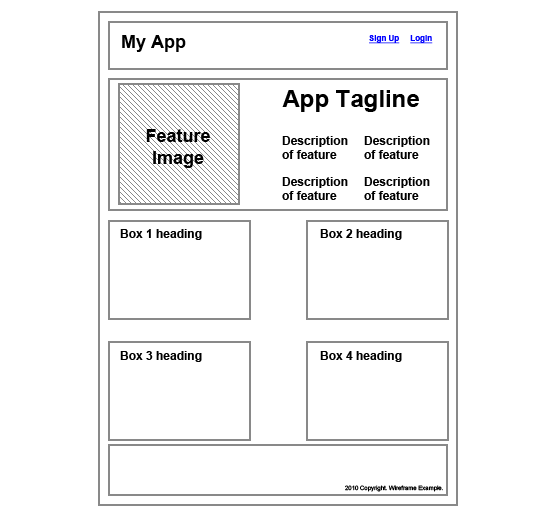
Wireframes are basic illustrations of the structure and components of a web page. This is generally the first step in the design process.
Mockups generally focus on the visual design elements of the site. These are often very close or identical to the actual final site design and include all the graphics, typography, and other page elements. Mockups are generally just image files.
Prototypes are semi-functional webpage layouts of a mockup/comp that serves to give a higher-fidelity preview of the actual site being built. Prototypes will have the user interface and is usually constructed using HTML/CSS (and even JavaScript for showcasing how the front-end interface works). This stage precedes programming the business logic of the site. While they might not have full functionality, they generally give clients the ability to click around and simulate the way the site will eventually work. Prototypes may or may not also include finalized design elements.
Wireframe vs. Mock Up vs. Prototype
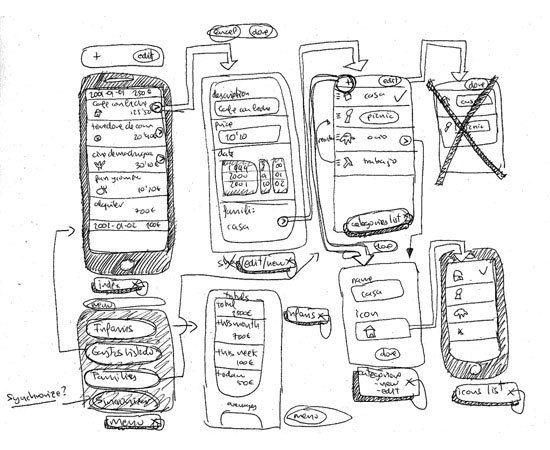
Rough sketch of user interface flow on a mobile app. Image by Fernando Guillen.
Wireframes come first. What follows — either prototypes or mock up models — is largely going to be dependent on the type of site you are building. If it’s a web app rather than a simple static website, it’s likely going to benefit from prototyping.

How to Create a Wireframe

Creating a wireframe can be as simple or as complicated as you want. In its most basic form, your wireframe might be nothing more than a sketch on some graph paper. Other "wireframes" are created digitally and are really more like prototypes, with clickable objects and limited functionality.
The type of wireframe you create will depend on what the individual project requires, as well as what your own workflow is like. More complicated projects will likely have more complicated wireframes, while simple sites might have simpler wireframes.

What to Include in a Wireframe

Your wireframes should include enough information to reflect what needs to appear on each page of your website. Think about the general elements of most web pages:headersfooters, sidebars, and content areas.
Then think of additional elements your specific project will have: dynamic widgets, basic site features such as search bars and navigation, graphics, and so forth.
Once you have an idea of what your site will include, start creating your wireframes based on those elements.
How detailed you want to get will again depend on the project and the purpose of the wireframe. If your wireframe is just going to serve as a guiding document for your own reference, then you don’t want to get too involved in the wireframing process. On the other hand, if it’s going to be used by more than one designer or developer, or presented to your client, then it needs to be more formal.

Low-Fidelity vs. High-Fidelity Wireframes

You have a couple of options when it comes to the style of your wireframes. Some designers opt for low-fidelity (low-fi) wireframes that are basically just lines on a plain background with some labels. These include both hand-drawn and digital wireframes, and they’re usually very simple.
An example of a low-fi wireframe for a web app
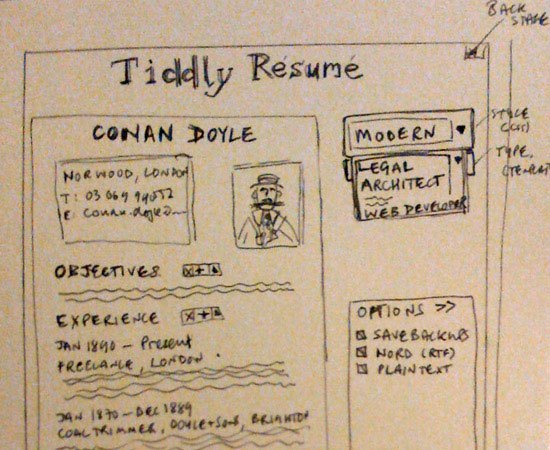
An example of a low-fi wireframe for a web app. Image by Paul Downey.
High-fidelity (hi-fi) wireframes go one step further, using certain design elements within the wireframe. This might include the logo or some other basic graphics, as well as the color scheme and other visual design elements.
Wireframes like this start approaching the level of mockups, but they can be invaluable in conveying a sense of what the website will look like, especially to clients who might have a hard time visualizing what a website will look like based on a low-fi wireframe.

Wireframing Techniques

There are dozens of different ways to create wireframes, ranging from simple, pen-and-paper sketches to more complex diagrams that look almost as polished as production websites.
There are also different approaches to the purpose and reasoning behind creating wireframes, depending on the needs of individual designers and projects. Here are some resources about different procedures for creating website wireframes.
Wireframing with InDesign and Illustrator
UXmatters has a great article on how to wireframe using Adobe InDesign and Illustrator. They talk about what led the to the decision to use InDesign and Illustrator over other products, as well as how they go about using these two applications to create their wireframes.
Grey Box Method
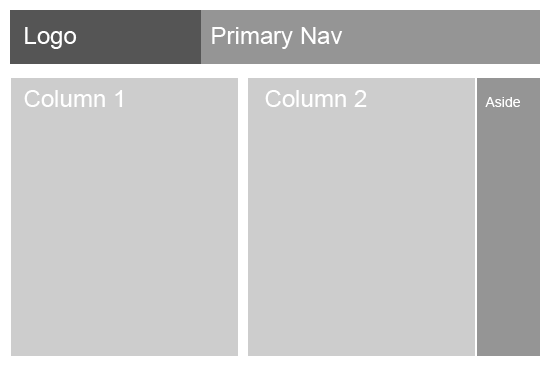
Jason Santa Maria has a fantastic post about the "Grey Box Method" of creating wireframes. He outlines his entire process for creating wireframes, from sketching on paper to creating a grayscale wireframe in Illustrator. He includes examples from a couple of different sites to illustrate his points.

Wednesday, May 30, 2012

LilCMS

First click here to download Lil' CMS. It's only 2 kb :) All that you'll find inside the archive are lilcms.php (CMS itself) and readme file. If you want to take a look at the code right now, here it is.

This is version 1.1 with "slashes bug" fixed (if you tried v1.0 you know what it is). There aren't any bugs any more, as far as we know.

Before everything, you need to know that pages with editable text need to be either PHP or SHTML. As for PHP any version would do and as for SHTML (extension that implicates that your web page uses server side includes), what you'll do is really basic and should work with literally any web host.

We recommend you first try with PHP extension. There're many handy php snippets around and you may want to use them with your site later -- in that case you will not need to change anything. In both cases (php or shtml) you will not need to insert any special code in order for them to work - any html page will work just fine if you rename it to .php or .shtml, these extensions are only notice for web server that maybe some dynamic code is inside too.
On to the installation! First create the following folders in the root (that's where your html/php/etc pages are) of your web site:

backup
content
cms

Now open TextEdit and create text documents with content that will be editable. For example:

introduction.txt
news.txt
footer_text.txt

Put them all in the content folder. Set their file permissions to 777 (this is very easy, every FTP client features Change Attributes command).

Set 777 to backup folder too.

Upload lilcms.php to folder cms. You can change its filename to whatever you like. You can change folder's name to whatever you like. It's completely ok if you access Lil' CMS through address such as www.somesite.com/cms9403KLC402/siteedit.php

You can also change location of text files if you like, just edit lilcms.php, it's right there in the second line:

$CPATH="../content/";

You may change word "content" to whatever you like.
We're almost there. Now go to locations of the web page(s) where you want editable text and insert the following piece of code:
If you renamed your web pages to SHTML:
If you renamed your web pages to PHP:
... and of course rename somefile.txt to introduction.txt or news.txt or whatever you came up with.
That'd be all! Now let's see how to use it.

Go to location of the cms, for example www.mysite.com/cms/lilcms.php
You'll get a window like this:
In the left column click on the file that you want to edit, then click on button Load. The file will open in the edit window on the right:
Before you edit a file it's wise to make a backup. Click on the button Backup and backup file will be created in the backup directory.
When you're done with editing, click on the button Update.

If you did something wrong, and if you backed up a file, click on the button Restore to revert the latest version.
That'd be all! :)

Web 2 CMS

First click here to download Lil' CMS. It's only 2 kb :) All that you'll find inside the archive are lilcms.php (CMS itself) and readme file. If you want to take a look at the code right now, here it is.

This is version 1.1 with "slashes bug" fixed (if you tried v1.0 you know what it is). There aren't any bugs any more, as far as we know.
Before everything, you need to know that pages with editable text need to be either PHP or SHTML. As for PHP any version would do and as for SHTML (extension that implicates that your web page uses server side includes), what you'll do is really basic and should work with literally any web host.
We recommend you first try with PHP extension. There're many handy php snippets around and you may want to use them with your site later -- in that case you will not need to change anything. In both cases (php or shtml) you will not need to insert any special code in order for them to work - any html page will work just fine if you rename it to .php or .shtml, these extensions are only notice for web server that maybe some dynamic code is inside too.
On to the installation! First create the following folders in the root (that's where your html/php/etc pages are) of your web site:
backup
content
cms
Now open Notepad (or such ;) and create text documents with content that will be editable. For example:
introduction.txt
news.txt
footer_text.txt
Put them all in the content folder. Set their file permissions to 777 (this is very easy, every FTP client features Change Attributes command).
Set 777 to backup folder too.
Upload lilcms.php to folder cms. You can change its filename to whatever you like. You can change folder's name to whatever you like. It's completely ok if you access Lil' CMS through address such as www.somesite.com/cms9403KLC402/siteedit.php
You can also change location of text files if you like, just edit lilcms.php, it's right there in the second line:

$CPATH="../content/";

You may change word "content" to whatever you like.
We're almost there. Now go to locations of the web page(s) where you want editable text and insert the following piece of code:
If you renamed your web pages to SHTML:
If you renamed your web pages to PHP:
... and of course rename somefile.txt to introduction.txt or news.txt or whatever you came up with.
That'd be all! Now let's see how to use it.

Go to location of the cms, for example www.mysite.com/cms/lilcms.php
You'll get a window like this:
In the left column click on the file that you want to edit, then click on button Load. The file will open in the edit window on the right:
Before you edit a file it's wise to make a backup. Click on the button Backup and backup file will be created in the backup directory.
When you're done with editing, click on the button Update.

If you did something wrong, and if you backed up a file, click on the button Restore to revert the latest version.
That'd be all! :)

Web 1 $& 2 Final Site

specifics:

  • 6+ pages(4 for seniors)
  • Professional Layout
  • Consistent Navigation
  • Client/Visitor appropriate colors, theme, images etc.
  • Use software of your choice to the best of your ability
  • Compare your site to another of a similar topic/theme, how does yours stack up? Our goal is for yours to be equally as impressive, professional, and functional.
  • It is often best to incorporate a variety of programs, styles, and techniques.  A well organized site may have a Flash element, Photoshop images/buttons, HTML layout tables/cells, and/or CSS all in one!!!!  Don't pigeon hole yourself into one style of design/code.

You need to design a site, using the program(s) of your choice on a (classroom appropriate) topic of your choice.

  • To get started please answer the 8 questions here
  • Next you need to create a layout sketch or wireframe for each page in your site.You can do this by hand or using Illustrator or ????
include the following in your wireframe:
  • your topic,
  • the program(s) you are going to use,
  • what your pages will be about,
  • and what the layout will look like for each page


Web Design 2, your final is the same in concept, though in practicality there will be a difference.  The main content of each page needs to be editable using a Content Management System.  This means that the text of the main body of each page will actually be written in a TextEdit document that we will then be able to alter using LilCMS.

More info to come...

A customized cursor

 To make a custom cursor follow these steps:

The code (based on a movie clip named MyCursorClass with a Linkage set to MyCursorClass:


import flash.display.Sprite;
import flash.display.StageAlign;
import flash.display.StageScaleMode;
import flash.events.Event;
import flash.events.MouseEvent;

var myCursor:Sprite;

stage.align = StageAlign.TOP_LEFT;
stage.scaleMode = StageScaleMode.NO_SCALE;

function init()
{
    Mouse.hide();

    // this creates an instance of the library MovieClip with the
    // name, "MyCursorClass".  this contains your mouse cursor art
    //
    myCursor = new MyCursorClass();
    myCursor.mouseEnabled = false;
    myCursor.visible = false;
   
    // you'll want to make sure the child is added above everything
    // else, possibly in its own container
    //
    addChild(myCursor);
   
    // respond to mouse move events
    stage.addEventListener(MouseEvent.MOUSE_MOVE, mouseMoveHandler);
    stage.addEventListener(Event.MOUSE_LEAVE, mouseLeaveHandler);
}

function mouseMoveHandler(evt:MouseEvent):void
{
    // whenever the mouse moves, place the cursor in the same spot
    myCursor.visible = true;
    myCursor.x = evt.stageX;
    myCursor.y = evt.stageY;
}

function mouseLeaveHandler(evt:Event):void
{
    myCursor.visible = false;
}

init();

 Kind of confusing I know... so here is an easier but less cool way to do the same thing:


if you do not need your cursor to be very precise:

name your instance name for your new cursor movieclip "cursor"
then add this code to frame 1 of your main timeline:


Mouse.hide();
stage.addEventListener(MouseEvent.MOUSE_MOVE,follow);
function follow(evt:MouseEvent){
 cursor.x = mouseX;
 cursor.y = mouseY;
}


Now all you need to do is double click on your movie clip and
move the object to align with the crosshair (this is the registration
point for your cursor).

Intro Movie

A few people have had issues with their intro movie button (enter/skip).  Here is the scoop for all things intro movie:

You will need to make a new scene to act as an introduction.
  • 200+ frames
  • skip intro option to enter site
  • related to topic
  • entertaining
  • professional
for code:

same code as other buttons but change the navigation to:

gotoAndPlay(frame #, "Scene Name");

frame # = the first frame of your number of your next scene "1" (typed out just as 1)

Scene Name = the name of your web site scene in the scene window (windows > other panels > scene).  This MUST be in quotes""

Thursday, May 24, 2012

Publish your site

To do so you need to follow a couple steps:

File > publish settings > set up to publish HTML and SWF

Choose a new folder on your desktop to publish these two files to, this is the folder you will turn in!

Monday, May 21, 2012

Preloader

For Extra Credit you can add the following to your movie:

PRELOADER!!!
for a more in depth preloader click here

We are going to make our loading movie on a new scene

We are going to start off with our preloader first, this frame is only going to have the text "Loading" and it will remain there until the website finishes loading. To do this, click once on the layer labeled Content then pick the Text Tool and write something in the middle of the stage.  Make this a movie clip with an animation that will loop while your movie loads.
Basic Flash Website - Text Tool "Loading"
We are now going to write the code for the preloader, click once on the Actionslayer and then right-click it and select Actions to open up the Actions panel. Paste the code below to program the preloader.
stop();

this.addEventListener(Event.ENTER_FRAME, loading);

function loading(e:Event):void {

var total:Number = this.stage.loaderInfo.bytesTotal;
var loaded:Number = this.stage.loaderInfo.bytesLoaded;

if (total == loaded) {

play();
this.removeEventListener(Event.ENTER_FRAME, loading);

}

}
This code is explained at AS3 Flash Preloader Tutorial. Please review that tutorial to learn about how this code works.
That completes our preloader part, close the Action panel once you are done to go back to your movie. We are going to start now working on the rest of the website. We will start off now by adding the background. You can use our background here to follow the tutorial. Simply right-click this image and selectCopy, we are going to paste it in Flash later.

Wednesday, May 9, 2012

site requirements

  • 3+ pages
  • transitions between pages
  • 200 frame intro movie
  • content on each page
  • looping movie clip on each page (related to your product)
  • extra credit:  preloader

Let's make your buttons link

To link your buttons you need to add some more code (different for EACH of your buttons).  You will also need stop commands at the end of your "pages"

:yourButtonsInstanceName.addEventListener(MouseEvent.CLICK, onClick);

function
onClick(event:MouseEvent):void{
gotoAndPlay("Your Frame Label Here");
}


Thursday, May 3, 2012

Due today

Turn in your menu (of whatever you have) today.

File > Export > .swf flash movie

Turn this into the classes folder.


Your menu ideally should have at least 3 functioning animated flash buttons with "over" and "out" transitions for each button.

Please turn in your movie/menu regardless if it is complete or not!

Wednesday, May 2, 2012

Adding Pages to your movie/site


Each "page" of your site needs to have a layer as well as a chunk of your timeline.  See above example 


 this is the timeline of your MOVIECLIP, it has its own timeline, this is how it should look: 
 

Flash Site Specifics

 Below is a list of specifics for your Flash sites.  These sites MUST be interactive, entertaining, and promoting/advertising a product/brand/event.
  • 1024x768
  • 3+ flash buttons/pages to your site
  • buttons must be movie clips with rollover events
  • 3+ pages must contain content
  • each page must contain an animated movie clip which loops throughout the page/time
  • transitions between pages (a simple tween to play after click)
  • a background that is appropriate to your site/product
  • a heading/title for each page
  • published as .html file